Messing About in Boats

Annie on test

Annie on test

“There is nothing, absolutely nothing half so much worth doing as simply messing about in boats” says Rat in the Wind in the Willows. I guess that many of us at IBTC must share this sentiment as we spend every day messing about in boats. At the moment we generally do so in a freezing cold boat shed, rather than sculling along the river with a wicker luncheon basket full of cold chicken, ginger beer and other goodies.

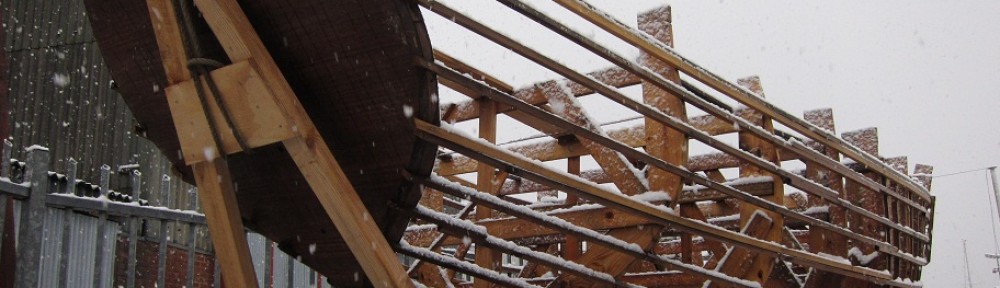
The boat that Michael and I spend all day in is Naiad, but she’s laden with tools and bits of wood that have either been taken off or are being put on. In the past few weeks we have replaced 17 of her timbers with copies that we fashioned out of 2 slices of an oak tree, we’ve roved in over 200 copper nails to hold the timbers to Naiaid’s planks and we’ve started reassembling the centreboard case.

The Artful Dodger

The Artful Dodger

Messing about in boats took on a more Wind in the Willows turn this week when we went out to Lake Lothing on a sunny afternoon for the test launch of two recently completed boats: ‘Annie’, a river Cam skiff from around 1908 that has been restored after her bottom almost rotted away and a newly built Herreshoff Columbia dinghy

The lifeboat wasn't required this time

The lifeboat wasn’t required this time

called ‘Artful Dodger’. It was a tense moment as they were carefully lifted into the lake, but both were pronounced dry and we took them out for a spin to see how they performed. They are both great little boats for a day out on the river, light to row, and look great with their highly varnished finishes. It was a brief foretaste of summer in the middle of winter. We went back to the boat shed with a spring in our step (or was it the sea weed that was helpfully stuffed into the boots left on shore during our brief river excursion).

Breaking Glass

Dave conducting impact research

Dave conducting impact research

On a cold morning last week, IBTC class 111 gathered outside the boat shed in white suits and solemnly took it in turns to smash glass fibre hulls to pieces with a hammer. It wasn’t a wooden boat builders’ anti-plastic-boat ritual; it was all in the name of educational research and definitely not at all for fun.

To rewind a bit, we had spent the week under the guidance of Rob, trying out glass reinforced plastic (GRP) hull manufacture and repair; just in case we’re ever tempted to work with boats that aren’t completely made of wood. The first thing to learn about GRP construction is that everything is done backwards: first you wax it, then you apply the outer finish, then you lay on the construction materials.

Coming out of the mould

Coming out of the mould

We started with a two part mould of  the bow section of a boat that we polished with mold release (so that our bow sections would drop out of the moulds with ease), then applied two layers of gel coat (it does seem strange to paint something that doesn’t exist yet). Then we applied alternate coats of polyester resin, and chopped strand mat until the layer cake seemed quite substantial. Then we had to leave it for the night. The next morning the bow sections popped out of the mould and looked perfect until they had their first appointment with a hammer. The structure of gel coat, polyester resin and chopped strand mat can take quite a hammering, but if there’s an air gap between the gel coat and the mat, the gel coat just flakes away, and it doesn’t look so pretty.

Building a base for an external repair

Preparation for an external repair

The damage had only just begun; the next step was to cut some holes in our (not quite so perfect) work so that we could try out some repairs. In one repair we were allowed access to the inside of the hull and in the other we were not, so we had to do the whole repair from the outside (quite likely in a boat repair when the insides haven’t been stripped out). The principles of both repairs were the same: make a negative of the hull shape required, tidy up the edges of the damaged area, file the edges to a razor sharp edge, and then build up the layers of resin, chopped strand mat and gel coat. The difficulty most of us faced was getting the depth of the repaired area to match that of the original structure, so when we started sanding it smooth, we lost too much gel coat and the resin showed through.

GrpChemicalsRob did a great job presenting the course, and the advantages of working with GRP were clear: strong, light structures with a perfect(ish) finish are quick to produce and easily scalable for mass production. One of the downsides is the requirement to work with a heady mix of chemicals with scary looking warning labels on them. I have to say that on balance I’d rather stick with wood.

By the way, the result of the impact testing was that the external repair was generally the first to cave in, usually because the backing plate wasn’t attached strongly enough, but even that took an impressive beating before giving in.

Class 111 during GRP training

The IBTC Teletubbies

You say router and I say router

RouterTableWhen I look back on some of my old posts from the joinery shop, I see that we used hand tools to make everything. Now that’s history because Andreu, Michael, Rod, Zac and I spent the last week under the watchful eye of Ian, building tables for our routers.

My dictionary gives the follow definition of the verb to ‘rout’:

cut a groove, or any pattern not extending to the edges, in (a wooden or metal surface)

but this only scratches the surface (sorry) of the capabilities of the router and router table combo; my planes are now gathering dust on the shelf.

The router table went together very quickly, and the router itself was an essential part of its construction. Many grooves not extending to the edges were cut, and even some that did reach the edge (also known as ‘rebates’). When it came to putting the surface on our table tops, there was a bonus: Ian brought out some sheets of walnut Formica that were ordered specially (or was that ‘found in the back of the cupboard’?).

IanWhen we’d built the tables, Ian showed us some of its capabilities; which are quite extensive. You can spend a fortune on router cutters and jigs to cut letter boxes, kitchen work surfaces  dovetail joints, skirting boards, tongue and groove, the list goes on; in fact Axminster have a whole section just on routing (none of their router tables have walnut tops though). While there’s not much that can be done to avoid the cost of cutters, Ian encouraged us to think about making our own jigs as attachments to the table. He showed us a whole range of jigs that he has made over a lifetime in joinery and hinted at some he has made that no one else has thought of yet; but we didn’t get to see them.

My first job after the router table workshop was to shape some more timbers for Naiad. Normally I’d reach for my plane for this job, but I thought I’d see if I could do it on the router table. A fair amount of trial and error was involved, and some of my test pieces got a bit chewed up, but once I’d got it set up, I was churning out shaped timbers at quite a lick (and I still have all my fingers). It got me thinking about my first idea for a jig which would make the setting up quicker; but it’s still on the drawing board; I expect Ian already has one.